In this article we will cover display connection standards and tips on how to get a "desktop" experience set up wherever you go!
You will need:
1. Laptop computer
2. Monitor(s)
3. Display cable(s) to attach your computer to your monitor
4. Power cable(s) to power your monitor(s) and computer
Depending on your computer and monitor's available display connections, you will have a few options to choose from. Please reference this image below for common display adapters you may see.
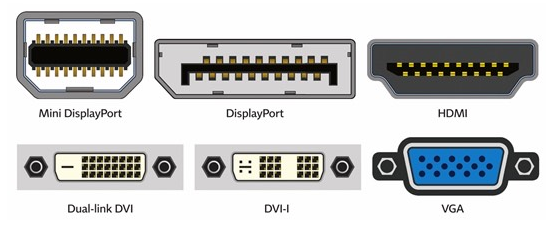
On most laptops, you will likely see at least an HDMI port or a VGA port. HDMI has been one of the main display connection standards for well over a decade now, while VGA is now considered a "legacy" connector that is usually included for backwards compatibility with older displays or hardware. Thankfully, most laptops in use at NHE have at least HDMI available.
One thing to note here: HDMI is an all-digital connector that will carry image data and sound data, while VGA is an analog connector that will only carry image data. Even though both connection types will perform well, we recommend HDMI due to its clarity, signal strength, and the added bonus of carrying audio data if you have a compatible display.
In order to attach your computer to your monitor, all you need to do is determine which type of display connector your devices have in common, obtain the requisite cables, and you're good to go! Be sure that you have a power cord for your monitor as well. The common standard these days is a C13 power cable, pictured below.

If you have a power connector other than the above for your monitor, be sure to use it, as it is not standardized and is likely proprietary.
Once you have your monitor powered and connected to your computer, you can now configure your display settings. On Windows, if you right-click anywhere on your desktop, you should see a context menu appear that gives you an option for "Display Settings." If you select this option, the display menu will appear.
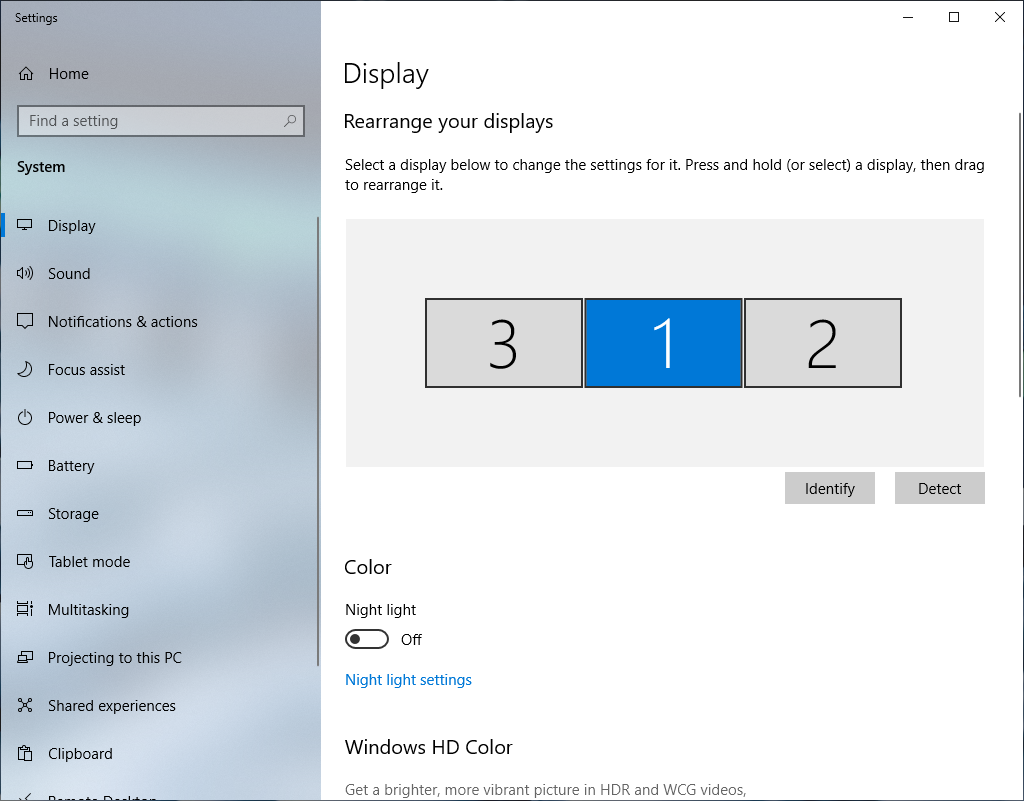
Here at the top you can see how many displays you have connected. You should have a minimum of 2 if you have one monitor connected. Please note that if you have your laptop's lid closed, you may only see one display listed in this menu. This is normal.
Your computer should auto-detect when a secondary display is connected. If you do not see your external monitor listed, you can click "Detect" on the right-hand side to force Windows to attempt to detect an additional display. Additionally, you can click "Identify," which will show on your monitor(s) which display is which. (1 or 2, or 3 in some cases, via a large pop-up number on the screen.)
On this screen you can also adjust the layout of your displays via a convenient "drag and drop" method. This is important for quick switching of windows and tasks from display to display, as a proper orientation will ensure that you don't have to drag your mouse too far in one direction to get to where you need to be.
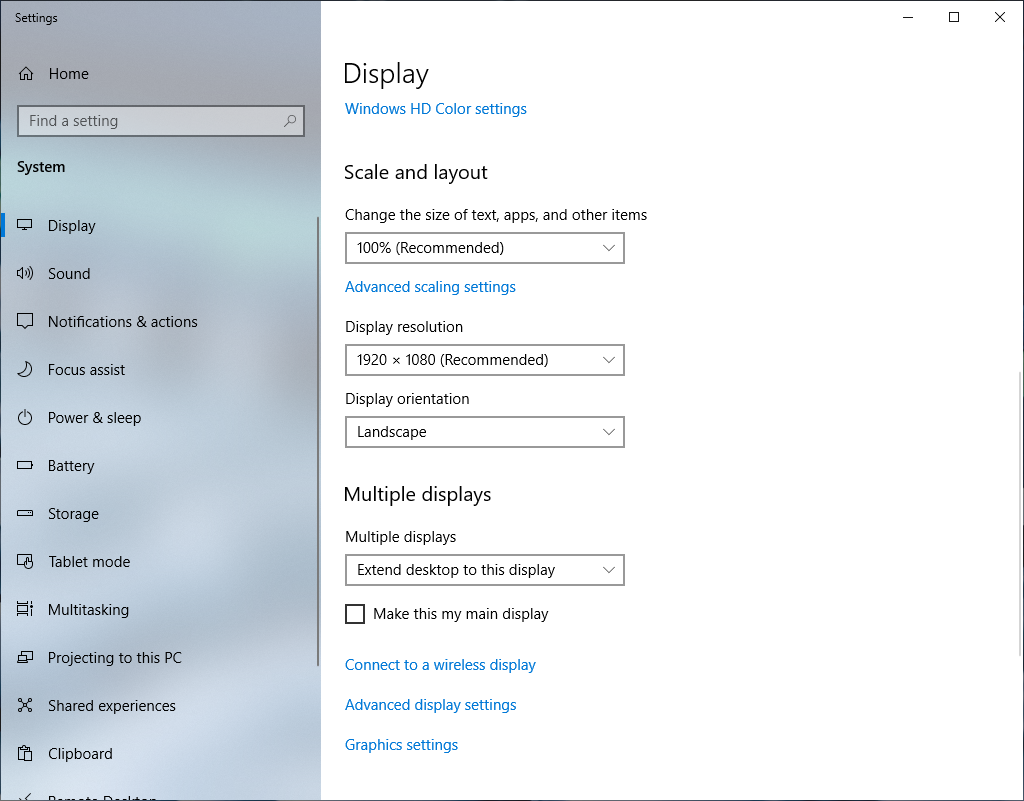
After selecting which display you'd like to configure and scrolling down on this menu screen, you will see the above options. Here you can change the scale of your display (the size of text, apps, and other items), your display resolution (how much screen "real estate" you have to work with), and configuration options for multiple displays.
We recommend keeping the display scale and resolution set to the Windows "recommended" setting. If you find that the text, for instance, on your display is too small and you'd like to scale it up a bit, try adjusting your scale to 125% first and then you can dial it in from there. We do not recommend changing your display's resolution from the default recommended setting, as some resolutions may make your image distorted or not be supported by your monitor at all.
In the "Multiple displays" drop down selector, you can choose what mode you'd like your monitors to use when you have an external display attached to your computer. The "Duplicate desktop..." option will effectively "clone" your desktop, and you will see the same thing on both your laptop's internal screen, as well as your external display. "Extend desktop to this display" will effectively treat your external monitor as a second display, which is ideal for multi-monitor setups. Please note that if you select this option you will not see any benefit unless you keep your laptop's internal display open as well.
Ensure that you have selected the correct display you'd like to configure in the "Rearrange your displays" section of this menu, or else the options you select either may not apply or they may apply to the incorrect display.
That's pretty much it! After reading through this article, you should now be able to:
1. Determine which type of display connection your computer and monitor(s) have.
2. Be able to attach and power your external display(s).
3. Adjust your display settings through Windows.
If you have followed this guide and are still having issues connecting or configuring your external display, feel free to create a ticket through Zendesk, and a member of our support staff will reach out to you directly.